Tutorial - Token transfer and Uniq purchase transactions
This tutorial will demonstrate how to use the Ultra toolkit for sending asset (transfer) and purchasing Uniq interact with Ultra the blockchain.
Prerequisites
Before starting this tutorial, you will need:
- A developer account on the Ultra Testnet and to be logged into the Ultra Toolkit. If you don't have it, please follow our previous tutorial: Tutorial - Log in to the Ultra Toolkit.
- Your account must have sufficient UOS tokens for transactions and fees. If you don't have tokens, see how to use Faucet.
Goal
The goal of this tutorial is to show you how to:
- Transfer UOS tokens between accounts using the
eosio.token::transferaction. - Purchase digital assets (Uniqs) using the
eosio.nft.ft::purchase.aaction within the Ultra ecosystem.
Transferring Tokens
To transfer tokens using the Ultra toolkit, follow these steps closely:
Step 1: Access the Transaction Builder
Open the Ultra toolkit and log in with your developer account. Click on the 'Transaction Builder' tab to begin creating a new transaction.
![]()
Step 2: Select the eosio.token Contract
Find the eosio.token contract from the list of available contracts in Add Contracts section. Once you add the contract, search for eosio.token::transfer action to initiate a token transfer.
![]()
Step 3: Fill in the Transfer Details
In the token transfer fields, enter the details of the transaction:
- From:
1aa2aa3aa4in(your account) - To:
1aa2aa3aa4io(recipient's account) - Quantity:
0.00000001 UOS(amount to be transferred) - Memo:
Test transaction(a note about the transaction)
Ensure all details are correct to avoid any errors in the transaction.
Finally press the Send 1 Action button.
![]()
Step 4: Preview and Confirm the Transaction
Review all the transaction details on the preview screen. Make sure that everything is accurate before you proceed.
![]()
Step 5: Confirm and Sign with Ultra Wallet
Confirm and sign the transaction using the Ultra Wallet extension. This step is crucial as it authorizes the blockchain to execute the transfer under your account.
![]()
Step 6: Transaction Completion
After signing the transaction, you will see a confirmation screen indicating that the transaction was successfully completed.
![]()
Step 7: Verify the Transaction
To ensure the transaction was successfully processed, visit the Ultra Testnet Explorer at https://explorer.testnet.ultra.io/. Search for your account (e.g. 1aa2aa3aa4in) to view the transaction details and confirm that the transfer went through as intended.
![]()
Purchasing Digital Assets (Uniqs)
To purchase a Uniq from the Uniq Factory using the Ultra toolkit, follow these steps carefully:
Step 1: Verify Factory Details
Begin by checking the Factory Explorer in the Uniq Explorer. Confirm the on-chain data for the Uniq Factory you are interested in, which in this case is Factory ID 4243, owned by account 1aa2aa3aa4io.

Step 2: Initiate Purchase Action
Navigate to the Factory page under the Uniq Actions section of the toolkit and then start typing purchase into the search bar. Then select the Purchase Uniqs directly action.

Step 3: Enter Purchase Details
On the purchase action screen, fill out the attributes necessary for the transaction:
- Factory ID:
4243(ID of the Uniq Factory) - Maximum Price:
1.00000000 UOS(maximum amount you are willing to pay) - Buyer:
1aa2aa3aa4in(your account) - Receiver:
1aa2aa3aa4in(your account, receiving the Uniq)

Scroll down to complete any additional required attributes for the purchase.

After filling the indicated fields press the Send 1 Action button.
Step 4: Review and Confirm Transaction
Carefully review all the transaction details on the confirmation screen to ensure they are correct before proceeding.

Step 5: Confirm and Sign with Ultra Wallet
Confirm and sign the transaction using the Ultra Wallet extension. This step is essential to authorize the transaction on the blockchain.

Step 6: Transaction Completion
Once the transaction is signed, a confirmation screen will display indicating that the purchase was successfully completed.

Step 7: Verify Ownership of New Uniq
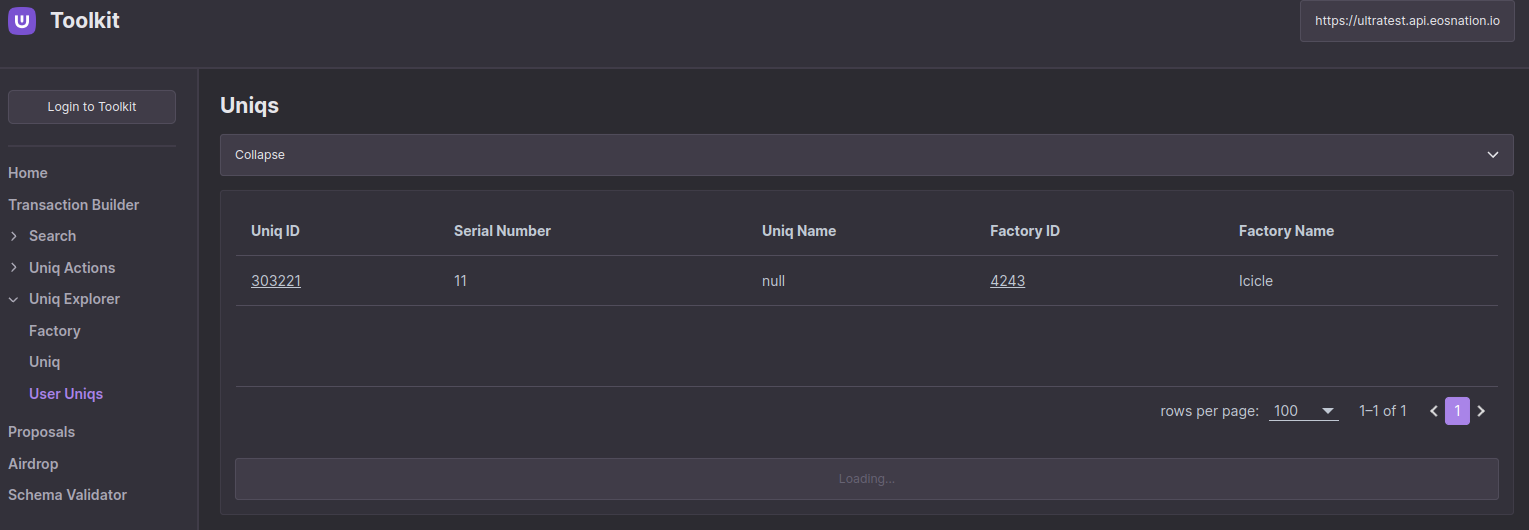
Step 7a: Access Your User Inventory Page
To confirm the purchase of your new Uniq, navigate to the Ultra toolkit page (https://toolkit.ultra.io/user). Once there, enter your account name (e.g. 1aa2aa3aa4in) in the Start the search by entering a username field. Make sure to set your endpoint to the test network at the top right corner, which for this example is https://ultratest.api.eosnation.io.

Step 7b: Verify the Newly Purchased Uniq
After entering your account name and setting the correct network endpoint, scroll down to view your Uniqs. Here, you should see the newly purchased Uniq from Uniq Factory 4243.
What's next?
TBA