Creating Metadata
What is Metadata?
Uniqs are tokens that can be associated with anything; games, assets, keys, items, and much more. The data that represents those things is the metadata. The title, the descriptions, and the images are all metadata.
Ultra has a specific format for how we expect metadata to be organized.
Using the Metadata Tool
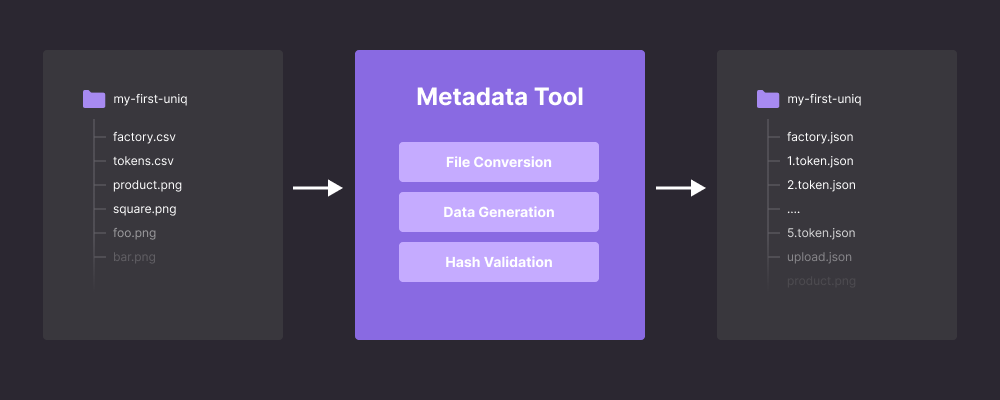
The metadata tool simplifies the process for creating complicated uniq factories and associating tokens with those factories. This tool allows the user to specify token factory specifications and corresponding token(s) specifications in an easy to use CSV template.
This tool takes CSVs and media files (Uniq images, videos and other supported media files) as input, converts to files to JSON objects, validates the JSON data, generates sha256 hashes of the JSON objects and outputs the generated JSON files.
Note that the tool itself does not interact with the blockchain; rather, it simplifies the process of creating complicated uniq factories and the associated tokens.
Obtaining the Metadata tool
- You can download the latest release of the tool from here.
- [Optional] Create a
config.jsonfile in the same directory as your binary/executable. Refer to Configuration file section for more info on the config file.
Configuration file
The configuration file (config.json) is a JSON object that allows user to map environment names to their corresponding base URIs. Each environment corresponds to a specific environment in which the metadata and media file for token factory and associated token(s) are to be be hosted/uploaded.
Here's an example of what the config file might look like:
{
    "production": "https://www.my-nft-website.com",
    "staging": "https://staging.my-nft-website.com",
    "mys3bucket": "https://s3.us-east-1.foobar.com",
    "custom": "https://www.my-custom-env.com"
}
In the example above, the production, staging, mys3bucket and custom environments are mapped to their corresponding base URIs. When the tool is run, it will read the config file and will prompt the user to select either one of the provided environments. The corresponding URI for the selected environment will be used as base URI for the generated factory and token(s).
Note that the environments and base URIs in the config file shown above are just examples, and you should replace them with the actual environment(s) for your use-case.
For our example, we'll be creating a config.json that looks like this:
{
    "custom": "https://developers.ultra.io/images/token-factories/example"
}Note: If you do not provide a config file, the tool will prompt you to enter a base URI manually.
How to use
Once you have obtained the tool, the next step is to setup the folder structure along with the media files, followed by adding data to the CSV template.
There are a few things to note.
- A report is always generated during runtime.
- Reports are not generated until you close the program.
- Reports will help you debug your CSV files, any missing information will be posted to the report and sometimes in the terminal / console window.
Setup Folder Structure:
To make it compliant with the token id card you must provide images:
- product: the principal image used when you expand the token id card
- square: used to represent your asset when the token id card is collapsed
- hero: used as the background when you expand the token id card
- gallery: a list of images and videos available in the carousel
To let the system identify those different elements you must provide a manifest.json where you describe your images by giving a textual descriptions and a path to them in the uniq_factory folder.
Aside the requirement above, you can put anything else in your uniq_factory folder. Those files will be part of the NFT owned by the user and will be the asset(s) the user bought.
It is recommended to use the following folder setup for ease of use.
example/ 📁 (This is your Root Folder)
|- factory.csv
|- tokens.csv
|- manifest.json
|
|- factory/ 📁
|   |- square.png
|   |- uniq.png
|   |- gallery/ 📁
|       |- media-01.png
|
|- tokens/ 📁
    |- 1 📁
    |   |- uniq.png
    |   |- gallery/ 📁
    |       |- media-01.png
    |
    |- 2 📁
    |   |- uniq.png
    |   |- gallery/ 📁
    |       |- media-01.png
However, the folder structure can be modified and replaced with a single folder that contains CSV files and relevant images/media files.
We provide a template example for you to use in the context of this guide.

Setup CSV Template:
- Use the following CSV template: Google Sheets Metadata Tool Template (Visit the link and go to
File -> Make a Copyto make a copy in your own Google Drive). - Open your copied CSV template in your Google Drive and begin modifications of individual fields. (Read the first sheet for information regarding the template).
- Export both
factoryandtokenssheets as CSV files.File -> Download -> csv - Rename factory file to
factory.csvand place in your root folder. (See Setup Folder Structure Above) - Rename token file to
tokens.csvand place in your root folder.
Image/Media Pathing:
There are two ways to link to an image/media file in your CSV file. One is relative path, and the other is an external HTTP or HTTPS address.
- Relative Path:
./tokens/1/image.png(Relative to your root folder) - External:
https://some-external-website.com/tokens/1/image.png
For example, in the above structure, your CSV file should have referenced the images like this:

If the paths in your CSV are incorrect, then when you try to run the metadata tool against the files which are online, you will get errors and your images in your uploads.json will show undefined. This must be fixed before you move on to the next step.
Supported Media Types:
The tool currently only supports the follow media types:
- jpg / jpeg
- png
- bmp
- gif
- webp
- mp4
- webm
- json
Running the tool:
Once the CSV files and all related images/media files are present in the folder, you can process the folder for JSON creation.
In Windows you can drag and drop the folder onto the executable. For Mac and Linux you'll have to run the executable from the command line with the folder as the parameter.
a. Watch the console window for errors. b. If errors have occurred, you can check the report generated after closing the application
If there are no errors, an
upload.jsonfile will be generated in your root folder.
Output file structure:
The upload.json file contains all metadata (collection name, factory/token hashes & URLs, media URLs) for your Uniq collection. A sample output file might look like this:
(This example is based on the sample folder structure provided above.)
{
    "collectionName": "MyFirstUniq",
    "factory": {
        "hash": "<sha256-of-factory.json>",
        "url": "https://www.my-nft-website.com/MyFirstUniq/<sha256-of-factory.json>.json"
    },
    "defaultToken": {
        "hash": "<sha256-of-defaultToken.json>",
        "url": "https://www.my-nft-website.com/MyFirstUniq/{serial_number}.json"
    },
    "tokens": [
        {
            "serialNumber": "1",
            "hash": "<sha256-of-1.token.json>",
            "url": "https://www.my-nft-website.com/MyFirstUniq/1.json"
        },
        {
            "serialNumber": "2",
            "hash": "<sha256-of-2.token.json>",
            "url": "https://www.my-nft-website.com/MyFirstUniq/2.json"
        }
    ],
    "media": {
        "factory/sq.png": "https://www.my-nft-website.com/MyFirstUniq/<hash-of-file>.png",
        "factory/product.png": "https://www.my-nft-website.com/MyFirstUniq/<hash-of-file>.png",
        "factory/gallery/1.png": "https://www.my-nft-website.com/MyFirstUniq/<hash-of-file>.png",
        "tokens/1/image.png": "https://www.my-nft-website.com/MyFirstUniq/<hash-of-file>.png",
        "tokens/1/gallery/1.png": "https://www.my-nft-website.com/MyFirstUniq/<hash-of-file>.png",
        "tokens/2/image.png": "https://www.my-nft-website.com/MyFirstUniq/<hash-of-file>.png",
        "tokens/2/gallery/1.png": "https://www.my-nft-website.com/MyFirstUniq/<hash-of-file>.png"
    },
    "environment": {
        "env": "production",
        "tokenUriTemplate": "{serial_number}",
        "url": "https://www.my-nft-website.com",
        "toolVersion": "1.4.0"
    }
}
Note that the URLs provided in the output file are based on the environment URIs that were provided to the program. These URLs are where your Uniq metadata files should be hosted/uploaded.